 After the base-course has been backfilled and compacted, you can begin to add subsequent courses. The relationship of vertical joints from one course to the next is called bond. VERSA-LOK’s unique hole-to-slot pinning system allows these joints to vary or wander in relation to other joints throughout the wall. However, units should generally overlap adjacent lower-course units by at least 4 inches to enhance structural stability. Regardless of the bond of your wall, be sure to keep all vertical face joints tight.
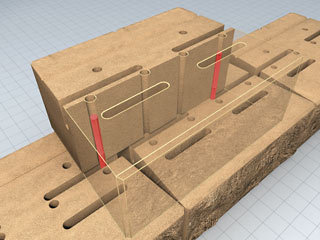
 VERSA-Tuff Pins inserted through the front holes of the upper-course units into the receiving slots in the lower-course units provide an automatic three-quarter inch setback and add structural stability.
Before you add each course, sweep off the tops of the installed units to remove any debris that may interfere with the next course. As you position the units, slide them into place. This will help remove any imperfections and debris from the surfaces of adjoining units and ensure a tight fit.
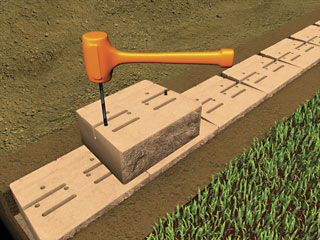
 Place and pin the units set back three-quarter inch behind the face of the base-course units. There are four front holes in each unit, but only two are used. When possible, use the two outside holes.
The two pins should engage two separate units in the lower course. Make sure the pins are fully seated in the lower unit slots. Use your mallet and an extra pin to seat the installed pins about 1 inch below the top of the upper units.
 After pinning, pull the units forward to tighten the pin connections. Then, check the alignment and level.
Click on image thumbnails to view larger versions